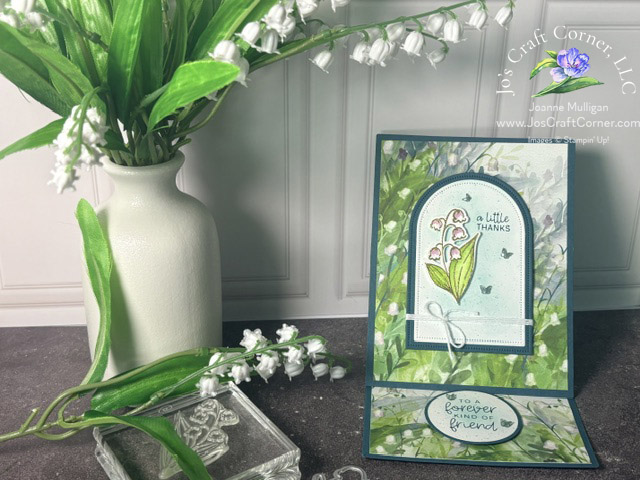

I’m sure you are like me and so many others, you want to get the perfect gift for someone but sometimes times a gift card is the only way to go. I know gift cards feel so impersonal like you just gave up and grabbed the first thing off the rack in the grocery store. Ok maybe that’s true, we have all been there. But I am going to show you how to make it VERY personal. Yes here it is folks, the perfect solution to giving that not so personal gift card….. the one and only greeting/gift card! I have seen similar ideas on Pinterest, and thought WOW what a great idea!! Unfortunately I didn’t pin it so I can’t give credit to the person who gave me the inspiration for this card. This was one of the projects we made for my August monthly stamping club. It is so easy and sure to be a hit with the recipient! Enjoy!

Let’s get started!!
Cardstock dimensions:
- Night of Navy Cardstock 4 1/4” x 11”
- Whisper White cardstock 4” x 5 1/4” (1), scrap pieces for daisy and saying
- Daffodil Delight cardstock 4 1/8” x 5 3/8” (1) and 1 3/4” x 3 1/2”
- Delightful Daisy Designer Series Paper (“DSP”) 1 1/2” x 3 1/2 “
1. Score your Night of Navy cardstock at 5 1/2″ and 9″. Fold on score lines and use a bone folder to get a nice sharp crease. Punch a half circle on the end that folds over for the gift card. This gives a little notch to pull the gift card out. Put adhesive on the outer edges only and fold over to create a pocket.


2. Attach Delightful Daisy DSP to the small strip of Daffodil Delight cardstock and attach to card front.

3. Stamp the daisy from the Daisy Delight stamp set on a Whisper White cardstock scrap twice using Night of Navy ink. Cut out using the Daisy punch. Tip: Slide your punch to the left and right, don’t pull it toward you after punching out the daisy. This helps your cardstock from getting caught! Color the centers with a Daffodil Delight marker.

4. Assemble the daisy so that the petals overlap each other. Use a bone folder to curl the petals under slightly, attach to the card. Apply a gold faceted gem to the center.

5. Stamp the Birthday greeting from the set Special Celebrations on a scrap of Whisper White, cut out using the 1 3/8” x 2 1/4″oval stitched framelit. Then attach to the card using dimensionals. I really love this set, it not only includes greetings for so many occasions but it has matching sentiments for the inside of the card. So versatile!

6. Attach the Daffodil Delight panel to inside of the card.
7. Lay the Whisper White cardstock panel on the inside, but don’t attach it yet! This is just in case you make a little boo boo stamping the inside of the card. Trust me I know from experience! I can’t tell you how many times I have made a gorgeous card, you go to stamp the inside and a smudge here, a splotch there and the worst….. you have the dreaded ink halo around the image! Ugh!! Now I never attach the inside panel until I have stamped it first. If I don’t have an inside panel I stamp the inside before assembling my card.
8. With the Whisper White in place, close the card and stamp the stem and little daisy, again from Daisy Delight set, in the center of the white space.

9. Stamp the inside greeting so it will be positioned under the flap.

10. Attach the inside panel over the Daffodil Delight piece.

Supplies Used:


Be sure to join my e-mail club! You will receive an exclusive newsletter, videos, specials just for club members and more!
If you would like to get a notification each time I post a project share, specials from Stampin’ Up! or myself, class schedules or video tutorials, please make sure you click “Follow By Email” at the top of this post. That way you won’t miss a thing!
As always, please feel free to share any post on Pinterest or Facebook! If you are interested in attending classes or any of my all day events be sure to visit my events page for a current schedule.
~~~~~~~~~~~~~~~~~~~~~~~~~~~~~~~~~~~~~~~~~~~~~~~~~
August Specials
From Stampin’ Up!:
Early Release Bundle – Carols of Christmas and Card Front Builder Thinlits. Between August 1st and 31st be one of the first to own a stamp set from the 2017 Holiday catalog! The Carols of Christmas set and coordinating thinlits Card Front Builder are a perfect addition to your stamp collection!
Fall Into Savings – Paper Pumpkin Promotion. New subscribers sign up for Paper Pumpkin between August 11, 2017 and September 10, 2017 and get the your first month half off! Enter the promo code HALFOFF0917 at paperpumpkin.com when you sign up to receive your discount.
LEARN MORE ABOUT THESE PROMOTIONS
From Me:
Everyone loves surprises! As a thank you for supporting my business, with any order of $35 or more (before shipping and tax) you will receive a FREE surprise gift bag share! Just enter Hostess Code JB7TVAUR when you place your order online. I will send your gift to the address used for your order. If your order is $150 or more DO NOT enter the code. If you enter the code you won’t get your Stampin’ Rewards for FREE goodies and I wouldn’t want you to lose out on those! I will automatically send your gift when the order is placed.